Coding with AI Part II: My Setup
I'd like to preface this write-up by first making fun of myself from the future. Not long from now, the title of this article will be akin to saying "Driving with a car" or "Cooking with electricity". You won't need or want to specify the AI part, that will just be assumed. It won't be "coding with AI", just coding.
Now that I've got that out of my system, let's get into it.
So in my first article on this topic, I focused on showing how modern programming assistants could be used to increase malware development efficiency and speed. In my subsequent talk at Cyphercon on the same topic, I focused on how AI can be leveraged for quick custom scripting and tooling on more of a per engagement need, again focusing on speed and efficiency. For this article, I was considering doing a really tedious deep dive post and walking through every single second of writing an advanced piece of malware with AI coding assistants, step by grueling step and document the whole thing.
But then I had (I hope), a better idea. I might still do the deep dive mentioned above, but it would stand to reason to first go over my setup for coding with AI. Fair warning, I'm going to make this pretty verbose and simplify some of the steps. If everything makes sense to you, please feel free to skip ahead, but I want to provide enough information that someone who has never considered using these technologies will be able to follow along and by the end, have the same setup as I do for coding with AI. I hope this is helpful to other red teamers who are curious about this topic, but may be unsure where to start. So let's go!
1. Sign-up For Accounts
Now I'm not gonna lie, using this stuff isn't exactly cheap. Last I checked, a PLUS account for chatGPT is $20 a month, and Copilot is $10. So that's $30 a month entryfees. It's less than ideal, I know. There are "free" options and open-source options, etc... and you may explore those. However, for the purposes of this article, I am focusing on what I have decided to personally use.
I don't want to advocate for specific vendors. I generally like to remain vendor agnostic, but this is about my specific setup, and I'll be honest, that the decisions of what tools to use here is based purely on merit. If you want to have the most accurate possible coding assistance right now for whatever you are doing, this is it. If you have a better solution, or something that I am not using, please reach out to me. But as far as I know, these are the best options at present, publically available, for achieving the highest quality coding assistance for red team purposes. I'll talk a little bit about why as we go through the setup.
If you haven't done so, and want to follow my setup exact, then signup for the accounts above at this point. If you are going to opt for cheaper, free, etc... other alternatives, then that is fine too, but everything won't be exact the rest of the way.
2. Get the Tools
-
Notekeeping
-
Rust (optional)
-
Windows/Mac SDKs
I was planning to go through the installs for all or some of the above tools, but I decided against it, in the interest of focusing this article on actually using the tech. A few notes though about my choices here seems appropriate.
So I personally like VS Code, mostly because of the amount of extensions available, as well as the ease of use of the UI and integration with various other system tools and services (like the terminal). I used to use a much simpler IDE. I still have a sublimetext license I upkeep, just to support the project. But these days, I am looking for as much highspeed, low drag tech as I can get my hands on. In the end, all that matters is if you are writing code consistently though, so use whatever you enjoy. But if you are using VS Code, be sure to also install the Github Copilot extension and login through the IDE. You can find information on setting up Copilot in your IDE at the link I provided above.
I put notekeeping in here, because this is about a workflow for Red Teamers, and Red Teamers need to take lots of notes, all the time, about everything. So we might as well talk about that while we are working through setup and workflow already. I have used probably every major notekeeping tool in the past, from Evernote to Onenote and every small indy tool in between. Nowadays I have a couple main requirements for any notekeeping tool. It must support a directory style structure that is easy to view and use in the left pane. It must support markdown. And preferably, it should have a 'source code' mode and reader or live preview mode. Obsidian checks the boxes and has added security, through a vault system, and it has advanced features for doing things like using a git repo for a vault so you can have live notes with your team. MarkText is a markdown editor that is sleak and sexy. I wrote this article in it. Cherrytree is my all-time favorite notekeeping tool. If you are looking for something a little more old school in design and feel, then give it a shot as an obsidian alternative. But as I said in the first section about IDEs, in the end, all that matters is you are coding and working, so use whatever notekeeping tool works for you.
I'm not going to cover why I like Rust as a programming language here. I also love C and use them about 50/50 when I work in low level languages. Use whatever you like here, but Rust and C are my choices for malware development, so we will cover examples using those.
SDKs are Software Developer Kits. You will want them. Just install them whenever you setup a new dev machine. It will save you time later.
3. Get to Work
Pop open a browser and navigate to either chat.openai.com or platform.openai.com. I personally still use chatGPT (chat.openai.com) a lot, but I am investigating and playing in playground (platform.openai.com) more and more. Regardless of which one you use (or if you are like me, just open both), get a tab open to it and login.
In a new tab, open up bing.com or you.com for a second AI chat assistant. I tend to have you.com up these days, since Bing has been severely nerfed for the purposes I was using it for, but YMMV. Try them both and see what works best for you. This is mainly just to have multiple sources for some of your more complex or novel requests. Or if a service is down and you need an alternative, etc...
Open VS Code (or your IDE of choice, jetbrains etc...) and make sure you are logged in to Github and the Github Copilot extension. Once you believe you are connected, you can test by opening or creating a new file and typing some comments to prompt the Copilot Assistant. Try something like `//print 'hello, world!'
If you are connected to Copilot, you should be able to hit enter once or twice and wait for a second, and Copilot will suggest the code for your print statement, which you can then hit tab to complete and accept, as so:
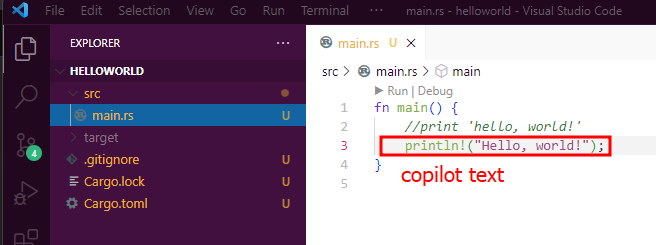
If Assistant doesn't provide anything, then double check to make sure you are logged in to the Github Copilot extension.
4. Example (hostname_retriever)
So now that you should have a setup, something like mine, let's walk through an example of creating a simple program using AI. Let's start with something really simple and make a program in Rust to retrieve our local hostname and print it to screen. First, let's just ask chatGPT what we should do.
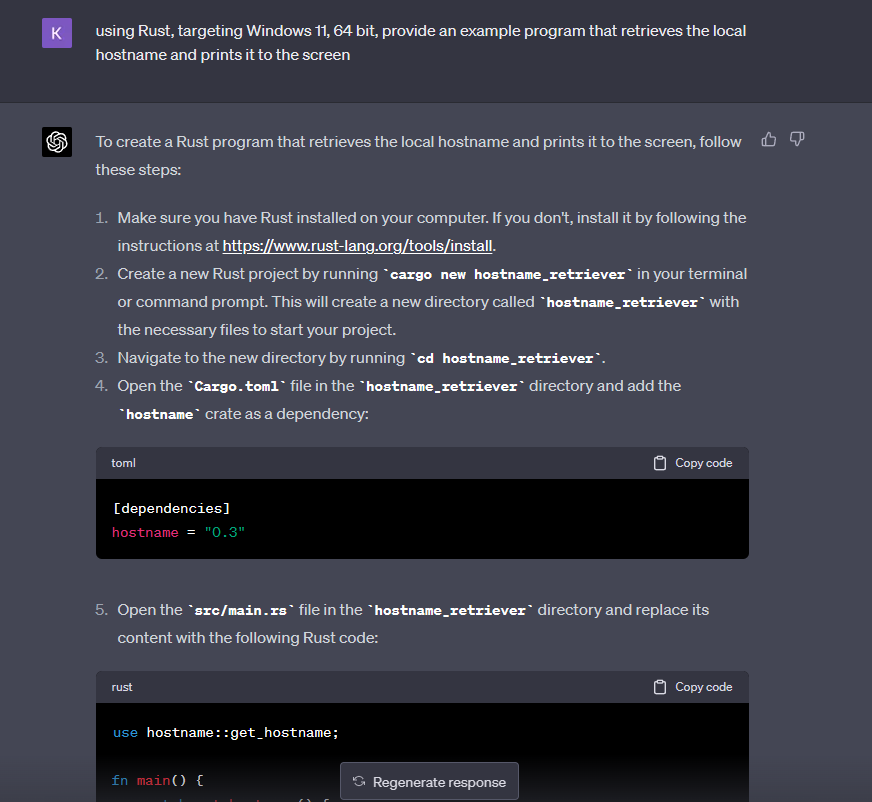
Perfect. ChatGPT provides a full walkthrough of what we need to do to accomplish our goal, and provides the code snippet for testing. Here's the code provided:
use hostname::get_hostname;

fn main() {
    match get_hostname() {
        Some(hostname) => println!("Local hostname: {}", hostname),
        None => println!("Failed to retrieve local hostname."),
    }
}
First thing I noticed is that chatGPT chose to use a Rust crate called 'hostname', instead of writing the functions from scratch. Rather than blindly use this 3rd party library, let's ask chatGPT for more details first:
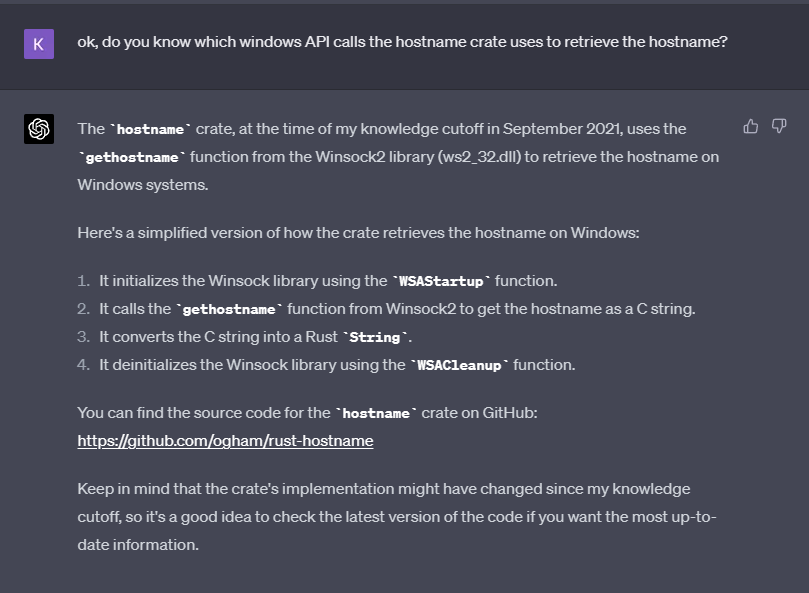
Interesting. A more verbose explanation than I was expecting. Funny thing, the github link provided by chatGPT is incorrect and 404s. However, a quick google and I found the crate does exist, but links instead to a repo here: svartalf/hostname: Cross-platform hostname functions in Rust (github.com). So looking at the source code for the hostname crate, it is obviously just calling another crate 'sysinfoapi', as shown in the code here:
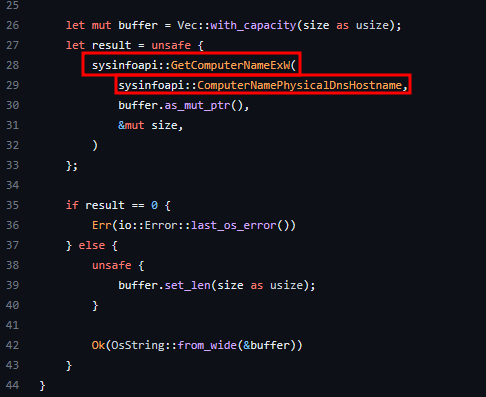
This code is really short and definitely not doing anything we cannot do ourselves. Let's investigate further and see what the sysinfoapi crate is doing, which we can find out here: winapi::um::sysinfoapi - Rust (docs.rs). Ah, it's just calling the Windows API, specifically the GetComputerNameExW and ComputerNamePhysicalDnsHostname functions, which reside in # sysinfoapi.h on Windows, as documented here: Sysinfoapi.h header - Win32 Apps | Microsoft Learn. Cool, so we can just skip using the hostname crate and implement the API call ourselves, eventually. For now, we drilled into the chatGPT suggestion and found that we are satisified with the source code, so let's test out the code provided.
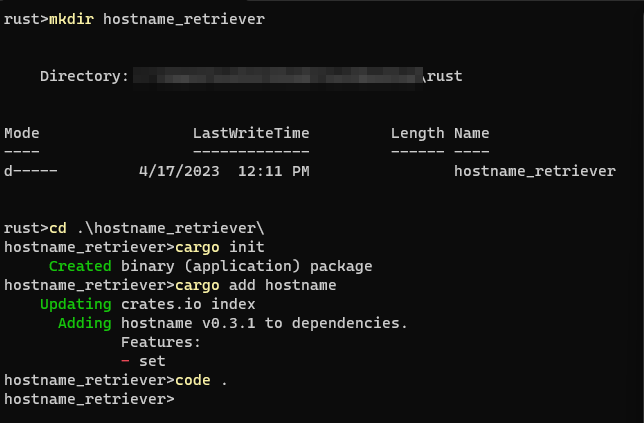
First, I create the directory, initialize a new cargo (Rust) repo, and add the hostname crate to the repo, like so:
I used 'code .' to open the directory in VS Code, and paste in the code previously provided by chatGPT:
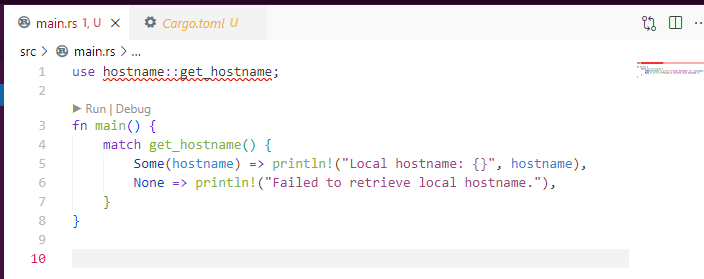
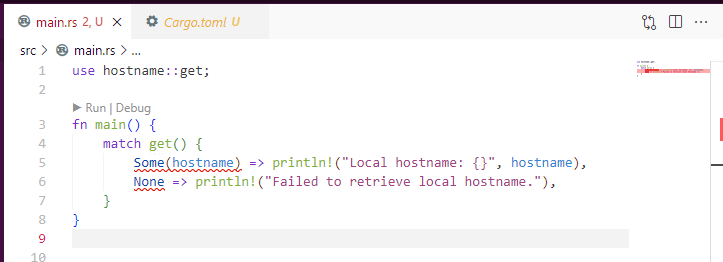
Right away, we have a problem. The get_hostname function within the hostname crate doesn't exist. You can see it is underlined in red in VS Code to let us know about the error. A quick look at the github source documentation shows the function should be called hostname::get not get_hostname. Let's change it.
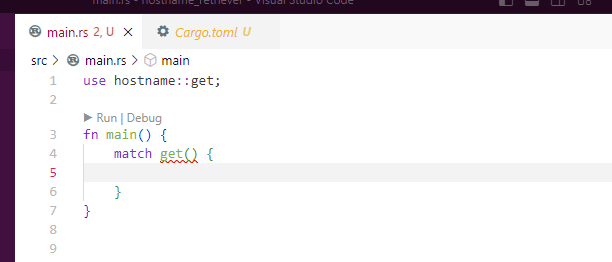
Hmm. More mess... This is quickly turning into a terrible example. Orrr, a great example of how chatGPT can muck things up! Since you are bound to run into these types of situations (especially using Rust!), this is a good opportunity to learn about working through some of the restrictions! Let's figure out what's going on and fix this code.
First of all, it seems that the Some function doesn't like the return value of hostname. Or maybe the return value requires error handling? Anyway, I played with this for a minute, adding std::io library and error handling, only to realize that I was creating more new problems. But this is exactly where our next AI programming Assistant comes in to help. Rather than fighting with this code, that in this case, is probably based on a hallucination by chatGPT, or some other error, let's stick with the crate we already reviewed, but let's give Github's Copilot a chance to fix it, right in the IDE!
To have Copilot fix it for us, I deleted the 5th and 6th lines of code, like so:
And Copilot immediately suggested the following:
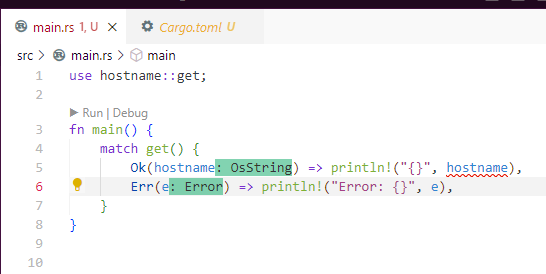
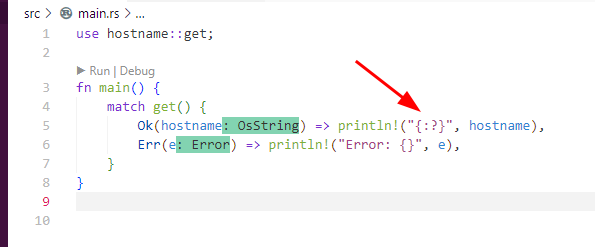
This requires a small change in line 5, changing "{}" to "{:?}":
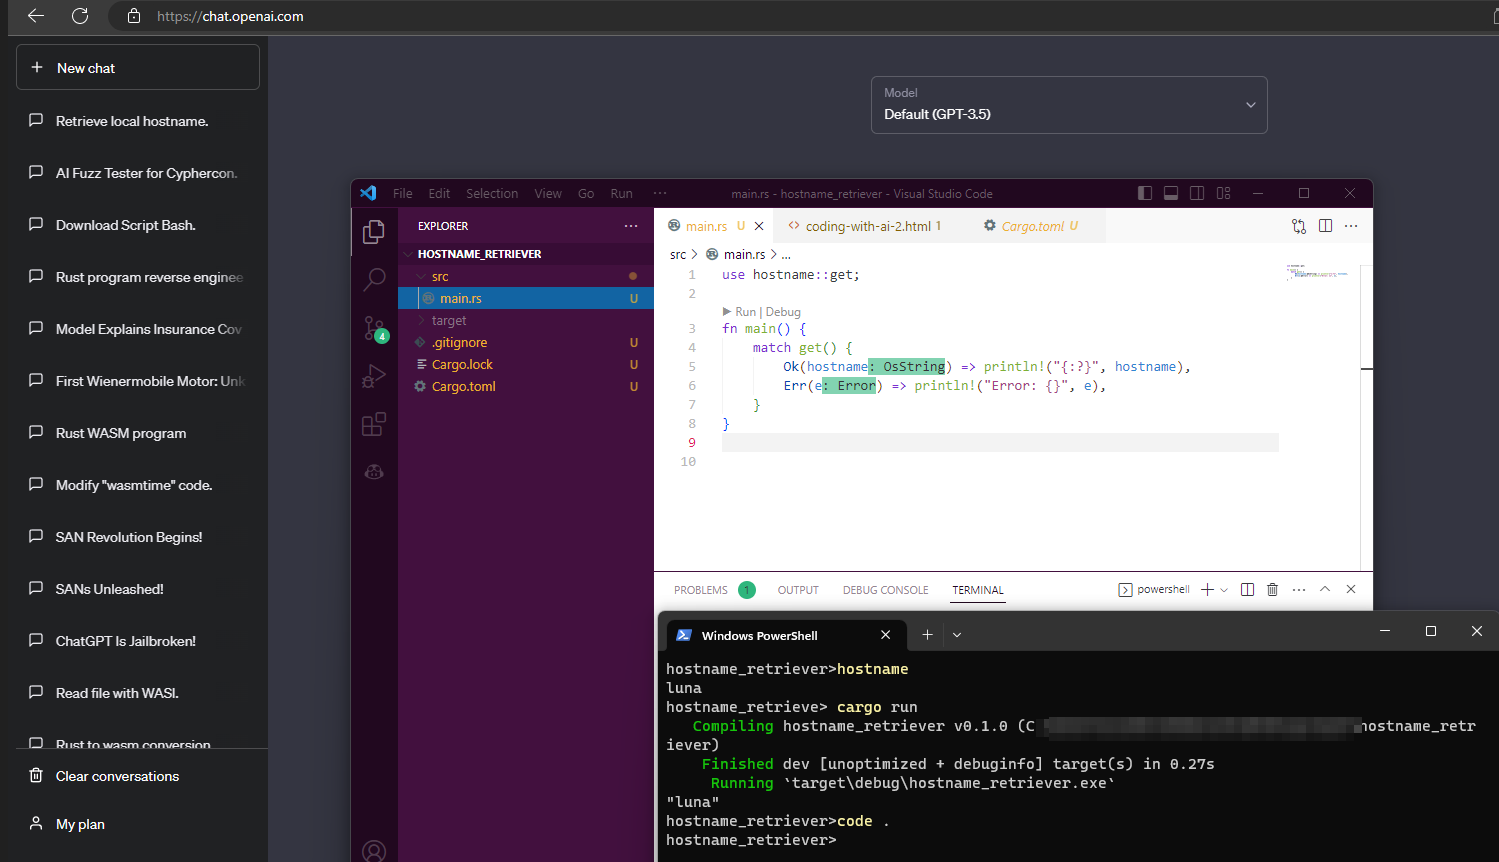
Now we can test the code, which at this point is a combination of efforts by chatGPT and Copilot. I'll test is using the 'cargo run' command, which first compiles the debug version of the binary and then executes it, as shown below.

As you can see, the program works!
Now this is just a really simple example, but we did get a chance to look at how we can take design decisions for our tooling from chatGPT, and how we can use Copilot to implement these designs into our code live in our IDE. I also eluded to earlier, how we could take this program farther by making the API calls or syscalls ourselves, instead of using the 3rd party library suggested by chatGPT. However, I think we will save that exercise for a future article on creating more advanced tooling with AI.
And here's a screenshot of my setup while I was working on this:
I hope you enjoyed this brief intro on starting to leverage AI coding assistants into your development workflow.
twitter: Kirk Trychel(@Teach2Breach)