Tempest c2: Intro
TEMPEST c2: Intro
When I really started to write the Tempest framework, was when I really committed to writing a c2 framework. It's a big commitment. I have long since lost track of the daunting number of hours that I've put into this project over the past year. I have a new respect for anyone who tries to tackle such long projects. For anyone who sees the Tempest project and decides to write their own c2 framework for the first time, know that the main thing you'll need is persistence. Just keep doing it.
Some background on myself. When I started this project, I was still learning Rust, and I didn't know anything about most of the code I ended up writing in this project. Tempest was first and foremost, always a research project. A learning project for myself. I believe now that it has become something which can be useful to others, so I'm glad to share it.
All I really knew when I sat down to start writing this framework, was that I wanted a callback. I knew I needed 3 things.
-
An "implant", or rather just a program that I could run on a system that sends a check-in message over some protocol to a remote server.
-
A server to receive the message and document the check-in.
-
A client program to interact with the server and view information.
I understood the concept of how API calls work, even though I'd never written any APIs myself or worked as a dev, so I started there. In theory, I figured, I could write an API for my server, and have the implant collect basic information about itself (hostname, etc...) and send the data to my remote server in a structured format. So that's how I started, with a single API call.
Of course, as I continued to expand upon that first API call, I kept adding things to this theory. Suddenly I needed authentication, sessions management, a database, internal functions, structs, mutexes, realtime dashdoard display, etc... And since its a research project, I attempted to solve all these problems myself, without really looking at other code for other frameworks.
For the people reading this blog and thinking of diving into malware or c2 dev, I highly recommend a similar approach. You may want to be a little less extreme in trying to not look at code examples, to better balance your learning with the product outcome, but I think solving problems for yourself a few times is a great way to grow.
Tempest is the name I gave the whole framework. Tempest consists of 3 main components. Everything is written in Rust.
TEMPEST COMPONENTS:
anvil - server
-
2 servers with APIs. All APIs are authenticated and unauth-discovery resistent.
-
sqlite local database
-
internal functions (building imps, generating shellcode, etc...)
-
linux based
conduit - hacker client
-
Terminal User Interface (TUI)
-
"Realtime" dashboard display
-
portable, runs completely in terminal
-
cross-platform
imps - beacons/agents/implants
windows features:
-
AES encrypted comms over TLS
-
OPSEC focused, feature rich (no bloat)
-
remote process injection
-
bof support
-
.DOTNET executable support
-
WMI
-
TEB walk "noldr"
linux/mac:
-
functional POC agents currently available.
-
roadmapped for further development
The server is currently configured to serve up 2 sets of APIs on 2 different ports (443 and 8443). I'm going to make this configurable in the server config.toml file, but at time of writing, these values are hardcoded if you wish to change them. The idea is that 443 is always for implants. I will in the future allow this listener to be turned on and off, but for now it is on by default. The reason I chose port 443 and to use HTTPS comms is because almost every target you will want to engage is going to be in an environment that allows TLS over port 443 outbound to the internet. Websockets would also work in most cases and is in development. Other protocols could be useful as well, but for initial access, HTTPS is still tried and true.
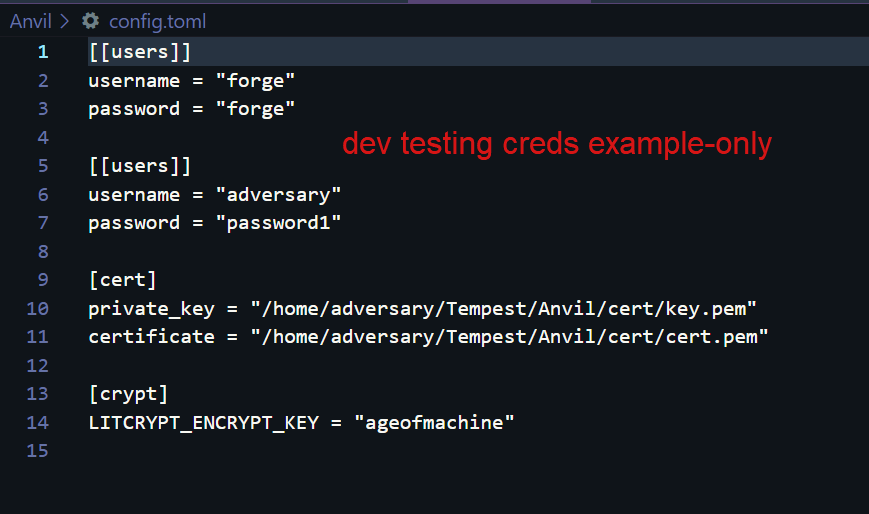
The anvil server makes use of a config.toml file, which is where operators will define their own username and password for auth to the server, as well as some other options, like the LITCRYPT key. This file will continue to be expanded to provide operators with more granular control over server operations. The server also requires TLS certificates stored locally to serve up content over HTTPS. The file paths are indicated in the config file as well. Below is an example config.toml file for the server.

Complete the config file, adding your desired users, change the LITCRYPT key if desired, provide paths to your certs, etc... Once the config file is filled out, anvil is ready to build with 'cargo build --release'.
(note, in the future I'll add http comms which can be automatically redirected using something like cloudfare or another CDN, to allow 3rd parties to manage TLS certificates).
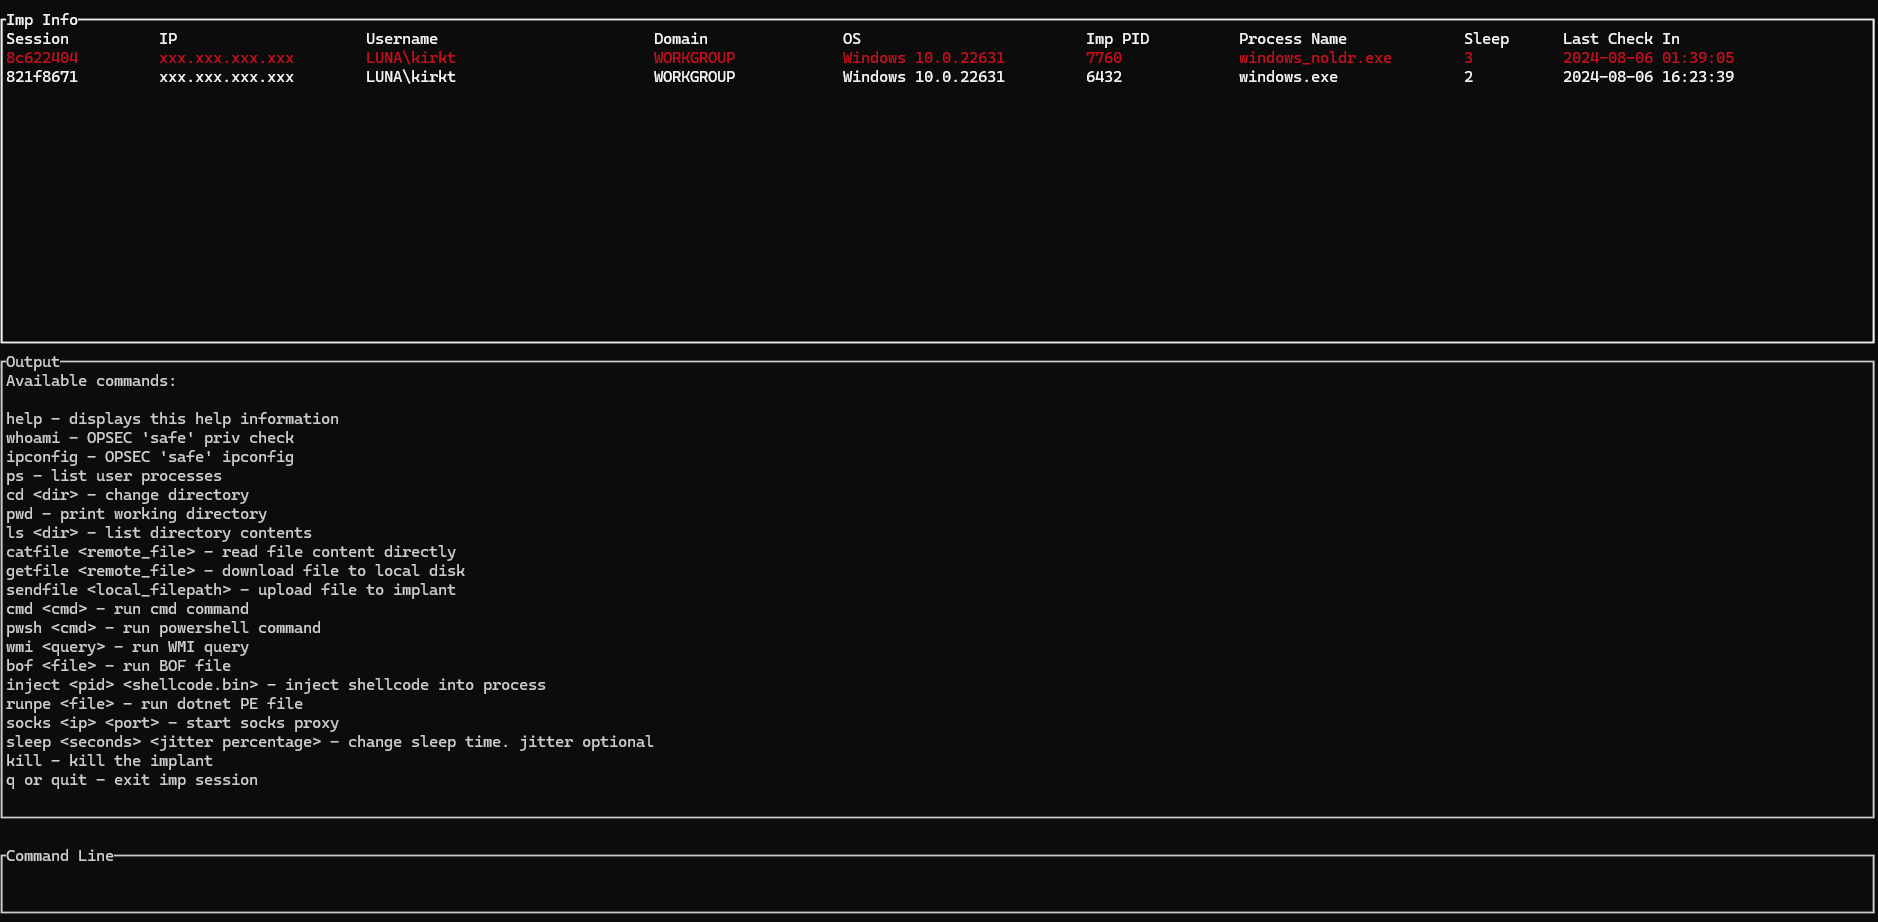
The conduit hacker client is the client for interacting with the c2 server. It is fully cross-platform, tested regularly on windows and linux, and runs entirely in the terminal. The binary, once compiled, is portable. Nothing needs to be installed on the system it is run from. Similar to a GUI or graphical user interface, the conduit TUI provides a realtime dashboard display in the user's terminal. And example is shown below:

Dead implants become red, admins are indicated in orange, currently alive implants in white. The last check-in time and sleep timers update in near real-time. Operators enter commands in the bottom line and view scrollable output. The dashboard displaying implants is also scrollable.
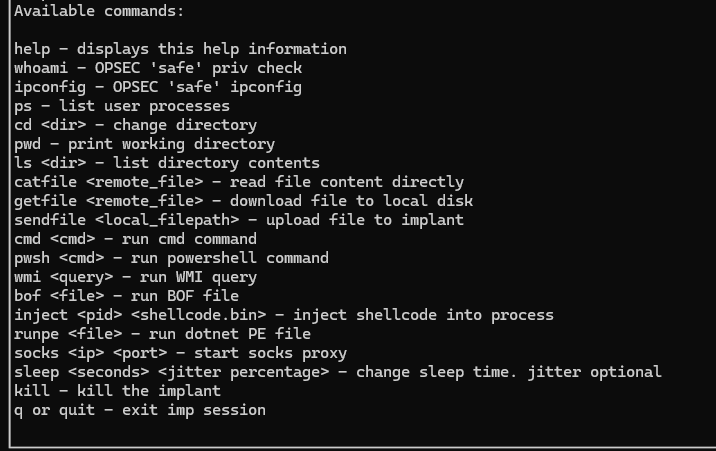
Let's zoom in on the post-ex features:

The implants come in a few different variations. There are several windows variants in active development and available to use. Linux and Mac have a delayed development schedule, but are released periodically in stable releases.
The main difference between the 2 most developed implants (windows and windows_noldr), is the different way in which windows functions and API calls are made. The windows implant uses LdrGetDllHandle and LdrGetProcedureAddress to locate function addresses for nearly every other API called in the program. The windows_noldr variant uses a TEB->PEB walk, by first reading a CPU register to locate the TEB (based on NTCurrentTeb), then locates the PEB and walks the PEB to locate dlls such as ntdll.dll or kernel32.dll. This allows the implant to locate function addresses for API calls, without calling LdrGetDllHandle and LdrGetProcedureAddress.
There are also variants which do not use, for example, the bof loader. This is because the versions with the bof loader included must be statically compiled and there are some trade-offs. I will say though that the implant is tested against a very popular EDR on a regular basis and the most developed implants each work fine against it and can load bofs without issue. The only post-ex module that has been flagged as of lately, is the runpe module that loads .dotnet binaries in memory, inline. However, this could be for a number of reasons (testing with public sharp tooling), and I personally lean more heavily towards using WMI and bofs anyway.
In the future I will write more detailed blogs about the inner workings of the implants, and discuss specific internal functions and code snippets.
Now some words on effective use of a framework like this. First of all, you will quickly notice that my shellcode generation is a bit of a trick. Any project like this requires prioritization of resources, in this case, my time. I only have so much. So when I find a trick that works really well, and lets me achieve function while saving massive research costs, I use it. For example, for a long time while this framework was in development, it didn't generate shellcode at all. The options were exe or dll. However, I structured the implant code in a very specific way, in order to generate a dll that would be compatible with sRDI and donut. I used the framework for a while, just generating a dll and passing it through donut to get shellcode, and then packing that shellcode with one of my scripts for making initial access payloads (a packer). Now the framework generates shellcode, using sRDI, but not using donut (you can still use donut and the shellcode will be different, another nice caveat).
The point is though, you should usually be using shellcode and placing that shellcode inside your own initial access payloads. The executable is for dev TESTING, not doing live pentests. It could be useful for things like purple team, but in most cases, you should be using the dll or shellcode and packing them inside your own initial access payload. Bring your own dropper. If you can't afford the dev time to create your own scripting for generating payloads, there are paid options like RustPack, MacroPackPro, and free options like Scarecrow and others. Use shellcode and please don't tell me how the binary got caught by EDR. I know. Use shellcode.
For post-exploitation, I have tried to be helpful. A lot of frameworks include as many features as possible in implants it would seem, making them a bloated mess of things you will never use. Additionally, EDR companies will rush out to make fragile detections for all the post-ex modules in a given public framework (these days even for closed source, quickly.) For these reasons, I tried not to include any modules that will obviously be of no value, with a couple caveats. I left in basic command lines, such as cmd, and powershell. These are for testing mostly and just for people who may want them, but they should almost never be used on a real engagement.
For safer alternatives, I included bof support, an effective remote process injection, and WMI support. I also wrote the whoami, ipconfig and other more basic modules like ps, by actually digging in to windows internals, and calling the same functions that are used by things like Task Manager, to retrieve a list of processes in the same way Task Manager would, but using our sneaky dynamically located function addresses. These modules should be pretty safe to use. But be aware of your situation. The framework can seem "simple" at times, because of a lack of options, but what I have tried to do is strip away all we don't need, and create a framework that guides the operator toward more OPSEC safe actions. But the ONUS is always on the operator to weigh every action and use what is right for their situation on an engagement. If this is done, the framework is very effective against popular EDRs.
Another good option for OPSEC is the socks proxy. This module is currently designed for a single implant to use and needs some more work to manage multiple sessions. Like a few of the more advanced post-ex modules, it is a modified version of an already public github repo. I provide credit on my repos and various docs / presentations. But the socks proxy is set up in a way for this project, to protect compromised clients. Many other frameworks simply open a socks proxy to the world and if the operator doesn't know better, could directly expose their clients internal systems to the internet. (msf proxy default to 0.0.0.0 for example). For this implementation, I have set up the socks proxy to only be available locally on the c2 server. This means that in order to use the proxy, an operator must ssh into the box running the anvil c2 server, like so:
ssh -L 1080:localhost:1080 username@anvilserver . By doing this, as operators, we can ensure that when we open a socks proxy on a compromised host, it is only available to users on our c2 box. More about this can be found in the Anvil readme.
I'd also like to talk a little bit about this initial release. I wanted to get this project out there at this time for a few reasons. The main one being that this is a side project and time is uncertain. I'd like to wait another year and do a lot more work on it, but none of us know what the next year holds really. Additionally, for a public or open source c2, I feel like the current state of this project is good for a release. I would consider this a 0.8 or so release, not really even 1.0. It's sort of early, but there are a lot of reasons that is positive. For one, if you want to make use of this framework, it is in a state that it is ready to be modified to your heart's content. It is functional and effective, while needing some love. You could take this project, and privately add a lot of features to it, which will never be publically available for EDR vendors to make fragile detections on.
It is also at a good stage for those who are wanting to learn more about writing their own tools and frameworks. I tried to limit complexity and I will be providing lots of additional documentation on the inner workings of the framework components, but as it stands, the code is about as easily readable as it will ever be. Additional updates are sure to rapidly increase complexity. So my hope in releasing it now in this state, is to provide code that can still be followed relatively easily.
Most of the code is just slapped together from my brain. There are some post-ex modules which are slightly modified versions of public tooling, as I mentioned above. Some of these were chosen to save time. Some were chosen because they are simply more mature versions of things I wrote myself. But some were also chosen because it demonstrates that it is possible to use slightly modified existing public tools in a framework like this, without compromising OPSEC in a meaningful way. For example, the BOF or coff loader is a modified version of https://github.com/hakaioffsec/coffee , which is itself based on the coffloader from TrustedSec here: https://github.com/trustedsec/COFFLoader . Yet, this coff loader works fine against popular EDRs right now in the Tempest framework, even using this public tooling. Other 3rd party tools integrated include:
https://github.com/yamakadi/clroxide (for runpe module)
https://github.com/deadjakk/RustPivot (for socks module)
Those are the only modules which use 3rd party tools for the whole module. For each, I forked them, modified them for my use case, and point the project at my forks, to maintain control and consistency with my project.
The process injection that I included (inject module) is based on https://github.com/FuzzySecurity/Sharp-Suite/tree/master/UrbanBishop , but has been ported to Rust and I've done a complete rewrite with my own additional techniques and flavor. Urbanbishop is at least 5 years old (last update), and yet, the module I included based on it is extremely effective against EDR. Just another example of what can be done by repurposing existing public tooling.
Overall, what I hope to accomplish with the release of this project, is to kindle the interest of future malware developers and red teamers, to go on to write their own frameworks and tooling. Tempest is very effective, and I considered just keeping it for myself and continuing to build it out with more features, but I think it will have much more value as a public project for others to learn and be encouraged. As such, I will be releasing more documentation, videos and tutorials, focused not just on using the framework, but on the code and innner workings. I hope you hackers enjoy it as much as I have enjoyed working on it so far.
Malware is software, and you can just go build things.
https://github.com/Teach2Breach/Tempest
twitter: Kirk Trychel(@Teach2Breach)